Contents
Index
Insert Point - Bearing Distance
The Bearing and Distance option allows a point to be defined by entry of a bearing and a distance from an existing point.
This option is available via the menu option Points/Geom/Bearing, Distance or via the points toolbar button.
Another way to start the Bearing Distance dialog is via the keyboard by pressing Control/B.
Point
Enter the new point number to be defined. This will normally be automatically allocated as the next unused Geom Point.
You can override this number, just type in the required number. Note that if you type in the number of an existing point,
the new point will replace the existing point.
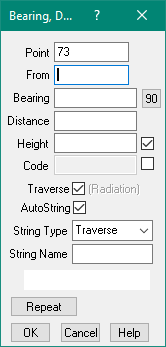
From
Enter the From point, this is the starting point for the bearing and distance calculation.
You can either enter an existing point number, or click on a point in the job.
Bearing
Next enter the bearing. For details of the many ways to enter Bearings click here.
Distance
Next enter the distance. For details of the many ways to enter Distances click here.
- To enter a distance in FEET, use ‘F’ or 'f' prefix. ‘F10’ is a ground distance of 10 feet or 3.048m
- To enter a distance in LINKS, use ‘L’ or 'l' prefix. ‘L10’ is a ground distance of 10 links or 2.01168m.
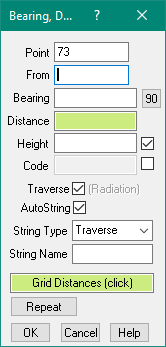
Grid/Ground Distance
If the job is on a Datum (see Job Properties) The green highlighted dialog will be displayed.
Green Highlights - It expects entry of GRID distances
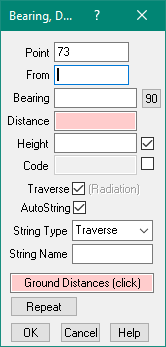
Pink Highlights - It expects entry of GROUND distances
Click on the 'Grid Distance' to switch between the two options.
Height
The height of the created point can be entered in the Height field. This field can be enabled/disabled by ticking
the check box to its right. When the box is disabled, the field is skipped and the point will be created with no height value.
Code
The point code can be specified by entering the value into the ‘Code’ field. This field can be enabled/disabled
by ticking the check box to its right. When the box is disabled, the field is skipped and the point will be created with no code value.
Traverse/Radiation
The program allows automatic entry of a ‘Traverse’ or a sequential series of point numbers,
the program automatically copies created point number to the ‘From pt’ for the next point to be created.
If you untick the ‘Traverse/Radiation’ check box the program assumes you are entering radiations from a
point and keeps the From point fixed.
AutoString
If you are in Traverse mode, you can tick the AutoString box to automatically insert the string joining
the created points. You can optionally select the string name to be created and the string type.
If you break the sequence of points, the program will automatically start another string.
String Type
Select the string type- Lot, Road, Drain etc from the list.
String Name
Enter the name of the created string.
Ground Dist
This field will display the ground distance when a grid distanceor ground distance is entered into the grid distance field.
To enter a ground distance, use ‘G’ prefix. ‘G1000’ is a ground distance of 1000 metres.
OK
Now press the OK button to create the point.
After the point has been created, the program will scan forward through the points to find the next unused point
number and will automatically use it as the next point number to be created.
Repeat
The repeat button can be used to automatically repeat the same bearing and distance values with the next from and to points.
Contents
Index